The Adventures of Shirley’s Spuds aka what’s for dinner

I do love a good potato. Baked, fried, hash browned, pancaked, twice baked, curried, boiled, YUM! They all have a place on my plate because they can be crispy and soft, mild flavored or boldly spiced. Would you like to join me as I share my spud secrets?

A good recipe takes some planning and cooking time. As a collective community, many of us are home bound and have the time now to explore in the kitchen. As a bonus, spuds are cheap. I just snagged a 10 pound bag of russets for $3.50.

I love crispy potatoes so decided on potato pancakes for my first recipe. Actually, I got the idea to share my spud secrets while I was making french fries a few nights ago. Yes, you can make french fries at home. They are so good piping hot out of the oven! I’ll feature those in an upcoming post. Now back to the potato pancakes recipe.

Recipe:

4 large russet potatoes, peeled and grated

1/2 cup grated onion

1 teaspoon salt

1 large egg

1-2 tablespoons all purpose flour

1/2 teaspoon ground black pepper

Peel and grate the potatoes. I use a Kitchenaid stand mixer with the grater attachment. A box grater using the largest grate opening works too. Grate the onion using the same method.

Toss the grated mixture with 1 teaspoon salt.

Let the potatoes, onion and salt sit in a colander while you are preparing the rest of the dinner, about 15 minutes. The potatoes need to drain liquid so they fry with minimum grease spatter and turn crispy. Use a paper or clean linen towel to ring out the last remaining liquid and/or to speed up the draining process. Discard the drained liquid.

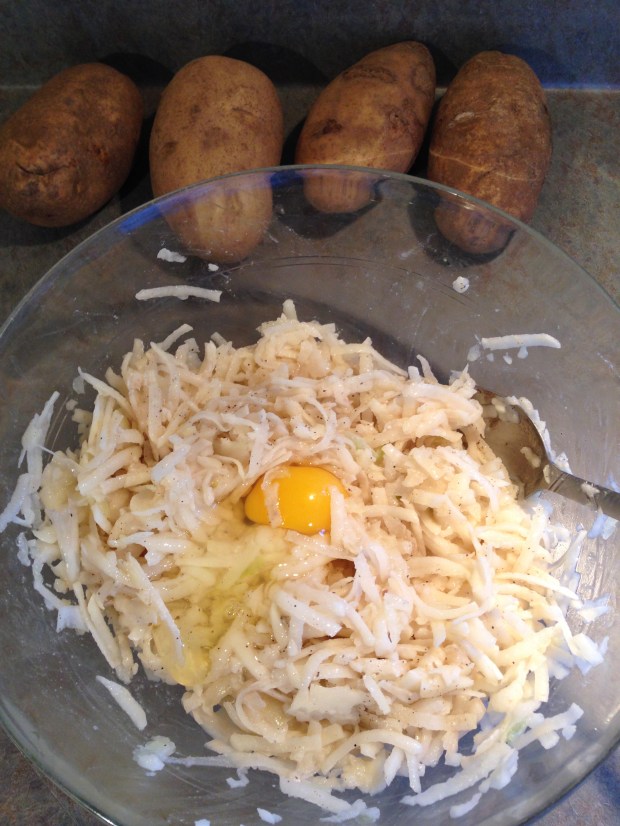
The drained mixture is next mixed with 1 egg, 1 tablespoon of flour and 1/2 teaspoon of ground black pepper. Add more or less flour depending on how wet the potato mixture is prior to adding the egg.

This photo shows the ingredients just prior to mixing the egg. Those 4 potatoes in the background will turn into baked potatoes today with homemade french onion dip, YUM. Now back to the current recipe…

IMG_0881

Now heat a large skillet with at least 4 tablespoons of extra virgin olive oil or the fry oil of your choice. There will be 2 fry batches using my 11 inch skillet. So I want all the oil in the pan from the start to fry both batches.

Be patient and wait for the oil to sizzle. Test the oil by flinging a few droplets of water from your fingertips into the oil. If the droplets jump, then the pan is hot. The oil should be shimmering too.

Now drop about 1/3 cup portions into the hot oil and flatten. If a sizzle sound is not heard, the oil is not hot enough. So wait a few seconds before continuing adding to the pan. Leave space between the mounds, enough to reach under with a flipper. Flip when the edges start to brown. Do a peek under to ensure the entire patty is brown before flipping. We want a nice, crispy patty! It should be only a few minutes of cooking on each side if your oil is hot enough.

Work quick after addition to the pan starts. So have the rest of the meal ready or enlist your house mates to time the rest of the meal so you can enjoy the hot, crispy potato pancakes with your other dishes.

We enjoyed cilantro topped crispy tuna quinoa bites on lettuce wraps with the potato pancakes. I’ll share those in another post as some point. I did not take prep photos of that dish. But it might be something you would like to try. They are crispy and delicious too:)

IMG_0882

The second best part about this recipe is that there are leftovers. The recipe makes enough for 4 people. I pair the leftover pattys with fruit and tea for a quick breakfast. My tea blend lately is mint and fennel with a sparse portion of Thai basil since my basil stock is almost out.

Hope you enjoyed my first Adventures of Shirley’s Spuds!

Super Awesome Spud Maker Shirley


Paper Pumpkin is for Family

It’s day four in my area of the kids staying home from school. I would anticipate that the transition to home schooling is being made with varying degrees of success. You might be thinking ahead for fun projects the kids can do on their own or with minimal help from you. Paper Pumpkin is your answer!

Paper Pumpkin is a paper crafting kit that is delivered directly to your mailbox. Give the kids the task of picking up the mail and they will be pleasantly surprised to find a box waiting for them around the 15th of the month.

The April kit is focused around the idea of making connections with family. Watch the short video and keep your eyes peeled for a sneak peek of the design.

Looks like something you would like to try? Watch the few minute video for the March kit showing assembly in fast motion.

The project design is always a secret to help with the fun surprise. But, they have been giving clues as to what is in the box lately. So we know the April kit will be greeting card designs.

FAQ’s: Your first box comes with a clear acrylic block to mount the stamps on. Reuse the block with future kits so don’t throw it out! Boxes start shipping on the 11th of each month. So you have until the 10th of each month to order subscriptions or skip a month in the subscriptions. Want a box each month? Then purchase a 12 month subscription!  Next, set up your account by following the instructions in the email that is sent after you make your purchase so Paper Pumpkin knows where to ship the boxes.

Here are the subscription prices. Purchase the 12 month option for the lowest price of about $22 per box, depending on the tax in your area.

Screen Shot 2020-03-17 at 8.21.11 AM

Sign Me Out! Purchase subscriptions through my online store by clicking here or click the Shop Now button in the upper right corner. Make sure my name is located in the upper right corner of the online store to make sure I get the credit for your purchase. You will get an email with further sign up instructions including a promo code which is linked to your purchase. Please use host code VQ4JQT4G if your purchase is under $150. If it’s over $150, do not use a host code so you can spend all the host rewards. I’ll send you a thank card for purchasing with me:)

Purchase a 3, 6 or 12 month subscription by the end of March and receive free, exclusive Sale-a-bration rewards. These rewards are available for viewing at my online store by clicking here. In addition, a 12 month subscription earns you host rewards. Purchase another subscription with the host rewards!

Please share this post with others that might like an affordable perk-me-up in their snail mailbox too! Thank you for sharing!

Super Awesome Stamper Shirley

Paper Crafting Blog Hop Happy Birthday!

bloghopbannerapril2018-001

I hope you are enjoying our Happy Birthday themed Independent Stampin’ Up! Demonstrators Blog Hop. Fellow demonstrators from all over the globe are participating so we have a wide array of fun projects to share with you! You may have arrived from      Annette McMillan’s blog. She had a fabulous project!

bloghopodmarch20202-001

bloghopodmarch20203-001

The supplies used plus one white pompom to stand in a for golf ball from the Assorted Pompoms pack and patterned paper from the Country Club package…paper snip blades were run along the garden green mat to give extra interest. I got a little crazy with the number of Stampin’ Write markers I used. I got ’em, may as well use ’em. I love how saturated the colors are when using these markers.

bloghopodmarch20201-001

Thanks for hopping with us each month. Now click on the next image to zoom to Tracy Held’s blog in Australia and see what fun project she designed.

bloghopnextapril2018-001

Here is a list of hoppers in case you get off the trail…

Shirley Merker YOU ARE HERE!
Tracy Held
Sue Boerner
Sandra Roberts
Sandy Ward
Sue McDonald
Arlene Carter
Anastasia Radloff
Annette McMillan

All the supplies to create this hand stamped greeting card can be ordered through my online store here. Please use the host code found on the right side of my blog when ordering through my online store if your order is under $150. If it is over $150, don’t use the code so you can redeem all the host rewards.

If you do not already have a Stampin’ Up! Demonstrator, I would be happy to be yours. Ready to enjoy the demonstrator discount? Join my Super Awesome Stampers Team for the best benefits! Click the Contact button above to get the conversation started.

Super Awesome Stamper Shirley

Ink, Stamp and Share Blog Hop Honey Bee

42535194_10156676672352208_1759988314120650752_n

Welcome to our Ink and Share Blog Hop featuring projects designed by fabulous Stampin’ Up! Independent Demonstrators. This month, we are featuring products from the Spring mini-catalog. If you are hopping around, you have arrived from Cindy’s blog and her fabulous project.

I have enrolled in a Beekeeper Program for 2020 and look forward to learning how to keep a hive happy. So I knew I was going to be adding the Honey Bee Bundle to my stash as quick as I could! I also have a stash of the coordinating Sale-A-Bration designer series paper too;)

1 20blog14-001

The little honeycombs that were cut using the die were attached to the upper left corner using a tiny dot of tombo green glue. Sponged crushed curry ink in a diagonal over the front to add depth.

1 20blog15-001

the supplies used…

1 20blog11-001

Please add a comment to let me know what you like about my honey bees design.

Thanks for stopping at my blog! Now click the next image to hop to Kate Bolt’s blog to see what fabulous project she designed.

42509444_10156676691752208_4164942744571084800_n

Here is a list of the participating demonstrators in case you hop off the trail.

Sandra Roberts

Laura Mackie

Sue McDonald

Cindy Mitchell-Clark

Shirley Merker YOU ARE HERE!

Kate Bolt

Rochelle Laird-Smith

Jo Blackman

Tricia Butts

Stacey Marsh

Gez Carpenter

Sue Allen

Kristie Meeker Wilson

If you do not already have a demonstrator, all the supplies used in my design can be ordered through my online store here . Please use the host code in the right column of my blog if your order is under $150. If it is over $150, do not use the host code so you can redeem all the host rewards.

Super Awesome Stamper Shirley

PPP Blog Hop Lovely Day

54006210_10219309231906317_8038300571733590016_o

Welcome to the Paper Pumpkin Possibilities Blog Hop! We will be sharing lots of ideas for using the February Paper Pumpkin kit, Lovely Day, in alternate projects. You may have arrived from Deb Naylor’s blog. She had a great project!

I tend to design alternate projects using just the stamps from the kit while plucking supplies from my stash. Crumb cake cardstock is a staple and coordinates beautifully with a photographic flower image from the Pressed Petals designer series paper package.

2 20bloghop2-001

Use a few markers and the 2 1/4 inch circle punch to create a quick and easy birthday card.

2 20bloghop1-001

In case you want to see the Stampin’ Up! fast motion video using the original kit contents…


Thank you for joining us as we share the possibilities of Paper Pumpkin. Now hop over to Tricia’s blog to see what she designed.

28619603_10216314905370025_5285954767905640659_o