Shelli Designed a Paper Pumpkin!

Screen Shot 2019-05-02 at 8.01.01 AM

Shelli Gardner, Stampin’ Up!’s board chair and cofounder, has designed her very own special edition Paper Pumpkin kit—and we think you are going to fall in love with it! It has a unique box design and an elegant, vintage look and feel which reflects Shelli’s personal papercrafting style. She loves it and so will you!

Shelli created a short video with a sneak peek at what’s inside. Take a look!

In addition to the sneak peeks in the video, they have revealed that the kit includes  crafting materials to create 12 cards (3 cards of 4 unique designs), 12 exclusive, coordinating envelopes, an exclusive photopolymer stamp set and and a Classic Stampin’ Spot. The colors used in the designs are Crumb Cake, Early Espresso, Old Olive, Petal Pink, Pool Party, Pretty Peacock, Soft Suede, and Very Vanilla. The card reveal is good news for those that have been asking for kits that only contain cards!

Interested in signing up? Click here to go to my Paper Pumpkin website to set up your account. If you are a new subscriber, then a clear acrylic block, used to mount your stamps on, will ship in your kit as a welcome gift.

Hurry, your account needs to be set up by May 10th in order to receive the kit. Set it up sooner since the kit is available while supplies last or May 10th, whichever is sooner.

Thanks and Happy Paper Pumpkin Paper Crafting!

Super Awesome Stamper Shirley

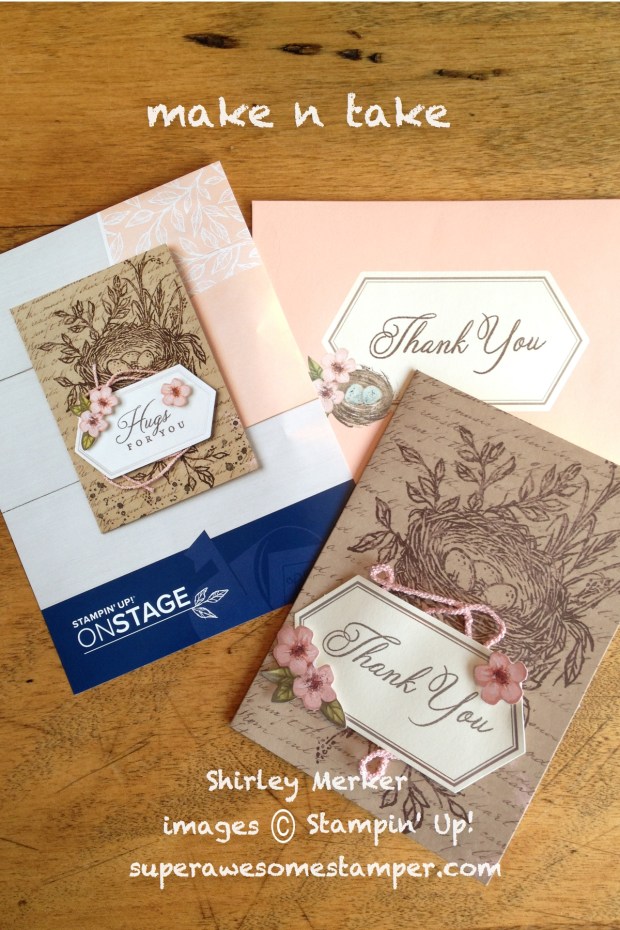
P.S. We got a sneak peek at Onstage Convention as a make-n-take. Here is what I created my supplies…

onstageapril1933-001


Paper Pumpkin Possibilities Blog Hop Poppin’ Birthday

54006210_10219309231906317_8038300571733590016_o

Welcome to the Paper Pumpkin Possibilities Blog Hop! We are fans of this monthly crafting kit. Follow the directions provided in the kit to make the projects as designed, or use the supplies as a starting point to let your creativity run wild.

On this hop we will be sharing lots of ideas on how to use the March Paper Pumpkin kit, Sentimental Rose, in alternate projects. You may have arrived from Janey Backer’s blog. She had a great project!

What to do with the stamps after the original kits contents are depleted? This month, I carefully opened the box and slipped only the stamp set out. I did not want my designing mojo to be influenced by the suggested designs included with the kit.

I started plucking pieces from my sniblets pile, added the Layered Leaves embossing folder to the crumb cake card base, daubed on Wink of Stella and crumpled up the fussy cut rose because it was just too flat looking (and that is just the kind of day I am having, a good busy but I am not going to get it all done before the clock strikes midnight!).

4 23 19ppbloghop1-001

Uncrumple the rose and voila!, came up with this idea…

4 23 19ppbloghop2-001

close up, uncrumpled…

4 23 19ppbloghop3-001

all the supplies used…

4 23 19ppbloghop4-001

in case you want to see the Stampin’ Up! fast motion video using the original kit contents…


Thank you for joining us as we share the possibilities of Paper Pumpkin. Now hop over to Lisa Kmiec’s blog to see what she designed.

28619603_10216314905370025_5285954767905640659_o


Paper Pumpkin Possibilities Blog Hop Poppin’ Birthday

54006210_10219309231906317_8038300571733590016_o

Welcome to the Paper Pumpkin Possibilities Blog Hop! We are fans of this monthly crafting kit. Follow the directions provided in the kit to make the projects as designed, or use the supplies as a starting point to let your creativity run wild.

On this hop we will be sharing lots of ideas on how to use the March Paper Pumpkin kit, Poppin’ Birthday, in alternate projects. You may have arrived from Charmane Hopkins’ blog. She had a great project!

Follow the photos below to see what I created. I started with the bonus numbers stamps by peeling back the protective plastic sheet. I inked 1-9 with Granny Apple Green ink. You can see the bottom row of stamps are uninked.

3 26 19bloghop1-001

I centered the inked stamps on Granny Apple Green cardstock and pressed on the protective plastic sheet with my fingers to transfer the ink from the stamps to the paper.

3 26 19bloghop2-001

Voila! A fun background!

3 26 19bloghop5-001

Add the streamers stamp along the edges to complete the background stamping. Use the included poppy parade ink spot to stamp the party hats around the gray striped paper that was cut from the kit contents.

3 26 19bloghop3-001

Add the sentiment on the die cut that was included in the kit. Decorate with the party hat and bow die cuts that were included in the kit.

3 26 19bloghop4-001

Stampin’ Up! produces a fast time motion Youtube video to show kit assembly as intended for the visual learners out there, including me! Watch the video here:

Thank you for joining us as we share the possibilities of Paper Pumpkin. Now hop over to June Olsen’s blog to see what she designed.

28619603_10216314905370025_5285954767905640659_o


Paper Pumpkin Pop Up Blog Hop Grown With Kindness

28701642_10216314905810036_5229522907894174650_o

Welcome to the Paper Pumpkin Pop Up Blog Hop! We are fans of this monthly crafting kit. Follow the directions provided in the kit to make the projects as designed, or use the supplies as a starting point to let your creativity run wild.

On this hop we will be sharing lots of ideas on how to use the February Paper Pumpkin kit, Grown with Kindness, in alternate projects. You may have arrived from June Olsen’s blog. She had a great project!

I decided to line our 3×6 inch gusset bag with one of the printed layers included in the kit. The treat will be “hidden” in the bag behind the printed layer.

About 4 mini 100 Grand candy bars fit inside the bag once the bag is opened.

Cut the patterned piece of paper to 3 and 7/8th inches parallel to the long side. Then score at 2 inches parallel to the short side.

3 6 19bh1-001

The long piece that was cut off from the main piece serves as a backer to the fresh fig banner. Use the Everyday Label punch to create a tag from one of the cardstock pieces. It has a pretty, neutral design printed on it already. Attach all the pieces of the tag using the included dimensionals. Tie a bow from the included ribbon. Add a dew droplet too from the kit contents.

3 6 19bh4-001

Did you notice the mirror reflection in the punch? It says a FREE Stamp Set is included in every March kit to celebrate Paper Pumpkin’s 6th birthday. Yah! Make sure to subscribe by March 10th with your demonstrator. Or pick me as your demonstrator if you don’t already have a demonstrator so you can get in on the March kit and your free stamp set!

Stampin’ Up! produces a fast time motion Youtube video to show kit assembly as intended for the visual learners out there, including me!

Thank you for joining us as we share the possibilities of Paper Pumpkin. Now hop over to Deb Naylor’s blog to see what she designed.

28619603_10216314905370025_5285954767905640659_o