Paper Pumpkin Pop Up Blog Hop Picnic Paradise

28701642_10216314905810036_5229522907894174650_o

Welcome to the Paper Pumpkin Pop Up Blog Hop! We are fans of this monthly crafting kit. Follow the directions provided in the kit to make the projects as designed, or use the supplies as a starting point to let your creativity run wild.

On this hop we will be sharing lots of ideas with you on how to use the July Paper Pumpkin kit, Picnic Paradise. You may have arrived from Sharon Burkert’s blog. She had a great project!

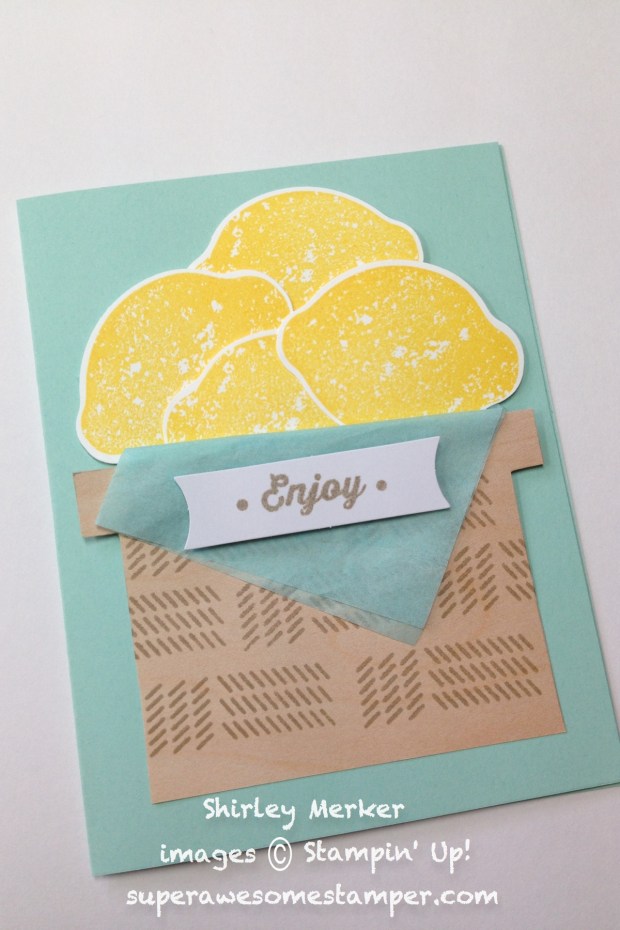
I designed a basket full of strawberries to decorate the front of a greeting card. These would make a fun, summertime invitation to an ice cream social during strawberry season.

7 31 18 cratecard3-001

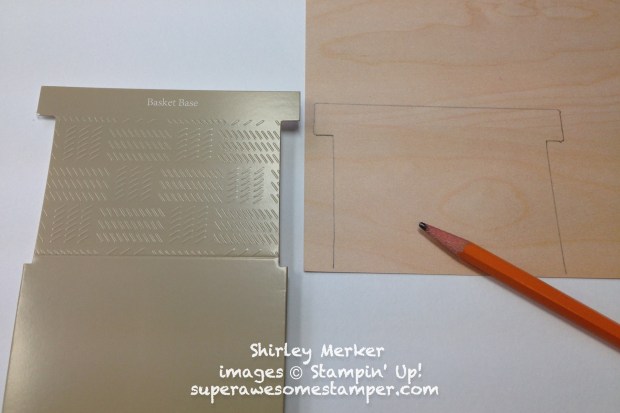
I used the basket from the kit as a template and traced it on a piece of the Wood Textures designer series paper. I cut along the tracing line and stamped the “weave” from the weave stamp that was included in the kit.

7 31 18 cratecard1-001

Next, I cut about a 5 1/2 x 5 1/2 inch of tissue from the blue tissue that is included in the kit. Fold the tissue into quarters, tuck inside the basket and fold 2 of the corners down. The blue tissue coordinates with our Pool Party cardstock which I used as the card base.

7 31 18 cratecard2-001

When the strawberries and blueberries that are included in the kit are used up, reach for our Lemon Builder punch and Lemon Zest stamp set and fill the baskets with lemons instead!

7 31 18 cratecard4-001

Thank you for joining us as we share the possibilities of Paper Pumpkin. Now hop over to Debbi Green’s blog to see what she designed.

28619603_10216314905370025_5285954767905640659_o

37554796_10217123032734889_6926461498759839744_n

If you are intrigued by receiving a paper crafting kit in your snail mail box, try it at a discount by using promo code BLOOM0818 at my Paper Pumpkin website by clicking here. This offer ends on August 10th so create your account now! Thanks for trying it out!


ICS Blog Hop Varied Vases

32665355_10216915228977740_1820335104300417024_o

Thank you for hopping around with us as we showcase a color challenge using the colors below. You may have arrived from Ginger Rabesa’s blog and her fabulous project. My project is below.

37037738_10217052040720133_1140109612867911680_n

I decided to use the stamp set Varied Vases and coordinating Vases Builder punch. But my stamp table had other plans for this project. I used the Vases Builder punch with a different stamp set.

The stamp set Crafting Forever was at the top of the pile since we had used it at the Card Buffet on Sunday. I picked it up because I was reading the sentiment incorrectly during the buffet. As I was thinking about the conversation I had with Diane during the buffet, I took a real good look at the writing. I was saying the verse as shown on the card below during the buffet and Diane corrected me. I was squinting at the red rubber while reading it during the buffet and had not used this verse before. I have been leaving the label off on the backside of the stamp so the stamp sticks to the acrylic block better. So there was no label to read, just the squinting at the red rubber.

7 25 18 houseworknever1-001

Raise your inky fingers if you have gotten lost in your stamp room and did not get the assigned house chores done. My hand goes up, but I am assigning the chores:) This was a funny moment during the buffet when I realized my eyes only saw what they wanted to see and I spoke what my eyes saw.

Use our 1/8 inch circle hand held punch to create the scissor holes…

7 25 18 houseworknever4-001

Attach a piece of ribbon since we mark our favorite ribbon cutting scissors this way…

7 25 18 houseworknever2-001

Use the Vases Builder punch for a pop of coastal cabana and blackberry bliss colors…

7 25 18 houseworknever5-001

Those half circle stamps are the scissor loops.

All the supplies used plus the Wood Crate framelit and blackberry bliss marker. Use the marker directly on the verse so the “whe” is not inked:)

7 25 18 houseworknever3-001

Thank you for hopping with us. Now click on the next image below to travel to Karie Beglau’s blog to see what fun colors she used in her project.

32855853_10216915229217746_6139564322663170048_o

Ink and Share Blog Hop Waterfront

28059369_10155813494401140_2143749391452299936_n

Welcome to our Ink and Share Blog Hop featuring masculine themed projects made with Stampin’ Up! products designed by fellow Stampin’ Up! Independent Demonstrators. If you are hopping around, you have arrived from Sandrin’s blog and her fabulous project. My hop design is below and features the Waterfront photopolymer stamp set.

IMG_8589

I have been wanting to ink up this stamp set for months and did I ever ink it up! I used all of these ink pads in order of the inking line.

IMG_8587

These are the colors I used…

IMG_8590

Linen thread and burlap ribbon were discarded as embellishment. They took away from the serene scene.

Thanks for stopping at my blog! Now click the next image to hop to Phoebe’s blog to see what summer themed project she designed.

28056089_10155809038661140_1202430587678687127_n

If you do not already have a demonstrator, all the supplies used in my design can be ordered through my online store here . Please use the host code in the right column of my blog if your order is under $150. If it is over $150, do not use the host code so you can redeem all the host rewards.

Super Awesome Stamper Shirley

Here is a list of the participating demonstrators in case you hop off the trail.

Deb Naylor

Cindy Mitchell-Clark

Jo Blackman

Ginger Rabesa

Rhonda Waechter

Sandrin Jse

Shirley Merker YOU ARE HERE!

Phoebe Borromeo-Carr

Linda Handford

Sue McDonald

Kirsten Aitchison

Jacqueline Bobeldijk-Schilder

Vickie Kerr

Tricia Butts

ICS Blog Hop Another Wonderful Year

32665355_10216915228977740_1820335104300417024_o

Thank you for hopping around with us as we showcase designer series paper that is part of the buy 3, get 1 free sale. You may have arrived from Karie’s blog. She had a great project.

I decided to use the Garden Impressions package because of the vibrant color schemes that virtually create a card on their own. To enjoy both sides of the paper, custom fold over a few pleats and “seal” them with our new Faceted Dots. The dots really do catch in the light showing off their facets.

The layered leaves embossing folder was used on the powder pink card base and also the envelope flap.

6 26 2018bloghop2-001

6 26 2018bloghop3-001

The supplies used along with powder pink and grapefruit grove cardstock. I see I omitted the flower framelit used to “seal” a flap from the Springtime Impressions framelits collection.

6 26 2018bloghop4-001

Thank you for hopping with us. Now click on the next image below to travel to Terri’s blog to see what fun colors she used in her project.

32855853_10216915229217746_6139564322663170048_o

Paper Pumpkin Pop Up Blog Hop Broadway Star

28701642_10216314905810036_5229522907894174650_o

Welcome to the Paper Pumpkin Pop Up Blog Hop! We are fans of this monthly crafting kit. Follow the directions provided in the kit to make the projects as designed, or use the supplies as a starting point to let your creativity run wild.

On this hop we will be sharing lots of ideas with you on how to use this June Paper Pumpkin kit, Broadway Star. You may have arrived from Deb’s blog. She had a great project! Here is what I designed…

Party favors and small gift packaging are items I frequently use. It is easy to transform the supplies from a Paper Pumpkin kit from the original project to treat toppers and acetate box inserts.

6 26 18bloghop1-001

Where is the color coordinating candy? I was thinking of fun stixs but Jim was the one that did the grocery shopping this week. Had I asked him to locate lemon lime twist colored fun stixs, you can imagine his response. So my 2×8 inch cello bags remain empty for now.

The Hooray card is inside an acetate card box. The card serves as fun decoration but is also functional since I will include an envelope for the card. About 5 cards with envelopes or small gifts like jewelry, chocolates or even lemon lime twist fun stixs can fit inside the box. 🙂

Thank you for joining us as we share with you the possibilities of Paper Pumpkin, now hop over to Karie’s blog to see what she designed.

28619603_10216314905370025_5285954767905640659_o